How to setup Node.Js with MongoDB using Docker
Quick Summary: Setup Node.Js With MongoDB Using Docker is a simple process, and some steps are best to follow. Starting to end, there are so many steps that one needs to follow. This article will clarify if you need to know all these steps. Please have a look at all these steps and start setting it up!
Introduction
Are you someone working with Node.js and want to set it up with MongoDB with the help of Docker? Do you need clarification about the steps that are mandated to follow to connect MongoDB Nodejs? If so, don’t worry and keep reading until the end.
In this article, we will help you to know about the steps and other relevant details regarding android Node js Mongodb docker. You may also get our help as we provide Node Js Services.
If you want to know more About Node.Js Developers Skills, follow the link. So without further ado, let’s get started with how to dockerize mongodb a node app and know how you
can get the Benefits Of Node.Js along docker node js app with mongodb!
How To Setup Node.Js With MongoDB Using Docker
Let’s dive into the Setup of Nodejs with MongoDB using Docker.
Docker Overview
Docker is an open platform for developing, running, and shipping apps. This Docker allows you to separate your apps from your architecture to deliver the software faster. With Docker, you can manage your infrastructure like you work your apps or docker node js app.
By taking advantage of Docker’s methodology for dispatching, testing, and uploading code faster on the server, you can significantly reduce the delay between writing code and running it to production.
The Docker includes the components like Docker client, Docker server, Docker Machine, Docker hub, Docker composes, etc.
A Docker Compose file is essential for defining and running multi-container Docker applications.
Docker Containers Vs. Virtual Machine
|
Docker Containers |
Virtual Machine |
| Integration in a container is quick and cheap. | Virtual integration is slow and expensive. |
| No memory wastage. | Memory wasting. |
| It uses the same kernel, but with a different distribution. | It uses many independent operating systems. |
Why Docker?
Docker is designed to benefit both the Developer and the System Administrator. There are the following reasons for using Docker –
- Docker allows us to easily install and run the software without having to worry about setting up or dependencies.
- Developers use Docker to remove machine problems like code working on some developer’s machine and not working on another’s machine when working with the team.
- Operators use Docker to run and manage applications on remote containers for optimal computer density.
- Enterprises choose Docker for agile software delivery pipelines to deliver new app features more quickly and securely.
Advantages of Docker
Docker has the following advantages –
- Executes the container in seconds instead of minutes.
- Uses less memоry.
- Prоvides lightweight virtuаlizаtiоn.
- Applications do not require a complete operating system to run.
- Uses app dependencies to minimize risk.
- Docker lets you use remote repositories to share your container with others.
- Provides constant deployment and testing environment.
Disadvantages of Docker
Docker has the following disadvantages –
- Increases the complexity due to the extra layer.
- It is difficult to handle a large number of containers.
- A Docker lacks some features such as container self-registration, container self-inspection, copying of files hosted in the container, and more.
- The Docker is not a good solution for apps that require a rich graphical interface.
- Docker has a cross-platform compatibility option means that if the app is designed to run in a Docker container on Windows, then it will not work on Linux or vice versa.

Dосker Architecture
Docker follows the client-server architecture, consisting of three key components: the Docker client, the Docker host, and the Docker registry.
- Dосker Сlient
- Commands and REST APIs are used by the docker client to communicate with the Docker daemon (server). Docker clients allow the user to interact with docker.
- Dосker Hоst
- The Docker Host is used to provide the environment for applications to run and execute. This includes the Docker daemon, images, containers, networks, and storage. It also communicates with other daemons to manage its services.
- Dосker Registry
- Docker registries are services that provide a location, from where you can download and store images.
Getting started with Docker
We check out the basics to get started with Docker. The parts include:
- 1: Install Docker on your machine.
- 2: Setup a simple node js application.
- Create Dockerfile for app.
- 4: Write Docker Compose configurations.
- 5: Add environment variables in the Docker Compose file to configure MongoDB and Node.js services.
- 6: Mongoose models.
- 7: MongoDB database connection.
- 8: Create an API for getting and storing users.
- 9: Run docker-compose to build the application.
- 10: Important Docker commands.
Part 1: Install docker on your machine(ubuntu)
- Set up the repository:
- Update apt package index using:
- sudo apt-get update
- Install packages that allow apt to use a repository over HTTPS:
- sudo apt-get install ca-certificates curl gnupg lsb-release
- Add Docker’s official GPG key:
- curl -fsSL https://download.docker.com/linux/ubuntu/gpg/ | sudo gpg –dearmor -o /usr/share/keyrings/docker-archive-keyring.gpg
- Set up stable repository
- echo “deb [arch=$(dpkg –print-architecture) signed-by=/usr/share/keyrings/docker-archive-keyring.gpg] download docker $(lsb_release -cs) stable” | sudo tee /etc/apt/sources.list.d/docker.list > /dev/null
- Update apt package index using:
- Install Docker Engine
- Update apt package index using: sudo apt-get update
- Install the latest version of Docker Engine and containers: sudo apt-get install docker- ce docker-ce-cli containerd.io
- Verify Docker Engine is installed correctly by running the hello-world image: sudo docker run hello-world.
Part 2: Set up the Simple Node JS Application
Let’s set up a node app without a docker.
- Create a node app with the following command
- npx express-generator
- Install the node packages
- npm install
- Run the app
- npm start
In the next steps, we will see how you can run this app in a Docker container using the official docker image. First, you need to create a docker image for your application.
Part 3: Create a Docker File for the App
In the example above we have seen how the project is created and how the application is tuned simply. Let us see how to create a Dockerfile and run the same application in Docker.
At the root of the project directory, we are going to create a Dockerfile.
We need to create a docker file that will create the Docker image. Here is the file that starts with the FROM command and the base image node: 8.11-Slim. We are using the /usr/src/app as a WORKDIR and copying package.json before installing dependencies. Doing this step first makes you not install these dependencies every time you change any files.
Now final “Dockerfile” look like this:
# From the base image node
                FROM node:8.11-slim
                WORKDIR /usr/src/app

                # Copy all the files from your file system to the container file system
                COPY package*.json ./

                # Install all dependencies
                RUN npm install

                # Copy other files as well
                COPY.

                # Expose the port
                EXPOSE 5500

                # Command to execute when the image is instantiated
                CMD ["npm","start"]

                Let me explain some points:
Let me explain some points:
- FROM: Install an image of the Node.js version.
- WORKDIR: Define the path to the working directory.
- COPY: Copy the package.json file into the container, and then the second copy all the files within the project directory.
- RUN: Run a command-line inside the container: npm install to install all dependencies in package.json.
- CMD: Once the image is created, run the script npm start.
- EXPOSE: You can tell docker that the container listening to which ports at runtime.
Part 4: Write Docker Compose configurations
At the root of the project directory, we are going to create the docker-compose.yml file. Follow the syntax of version 3 described by Docker:
Your docker-compose.yml should now look something like this:
version: '3'
                services:
                app:
                container_name: docker-mongo-demo1
                restart: always
                build: .
                ports:
                - '5500:5500'
                external_links:
                - mongo

                mongo:
                container_name: mongo
                image: mongo
                volumes:
                - ./data:/data/db
                ports:
                - '27012:27017'

                mongo-express:
                container_name: mongo-express
                image: mongo-express
                ports:
                - '8083:8081'
Let me explain some points:
- age: Official Docker image
- restart: Configure restart policy
- env_file: Specify our .env path which we will create later
- container_name: Specify a custom container name instead of the one created by default.
- ports: The specified ports are used.
- volumes: Map volume folder.
Now use the command to run the entire setup in development mode to monitor the container:
- Build with no-cache
- docker-compose build –no-cache
- Start the services(Check on your browser http://localhost:5500)
- docker-compose up
- List the services
- docker-compose ps
- List the containers
- docker ps
- Stop services
- docker-compose stop
Part 5: Mongoose Models
We can create a dedicated ‘models/user.js‘ directory to store our mongoose model and we’ll start with a user.js file. The model describes only two field names and the city of the users.
user.js will contain this code.
const mongoose = require('mongoose');
                const Schema = mongoose.Schema;
                const UserSchema = new Schema({
                name : { type: String },
                city : { type: String },
                },
                {
                timestamps: true,
                });
                module.exports = mongoose.model('user', UserSchema, 'users');
Part 6: MongoDB database connection:
Create a file that exists in ‘midddleware/database.js‘.
Here we have created a database name as docker-db.
const mongoose = require("mongoose");
                const connect = async () => {
                try {
                const options = {
                useNewUrlParser: true,
                };

                const connection = await mongoose.connect('mongodb://mongo:27017/docker-db', options);
                if (connection)
                console.log("\x1b[32m%s\x1b[0m", "Database Connected Successfully...");
                } catch (err) {
                console.log("\x1b[31m%s\x1b[0m", "Error while connecting database\n");
                console.log(err);
                }
                };
                module.exports = {
                connect,
                };
Part 7: Create API for getting and storing users.
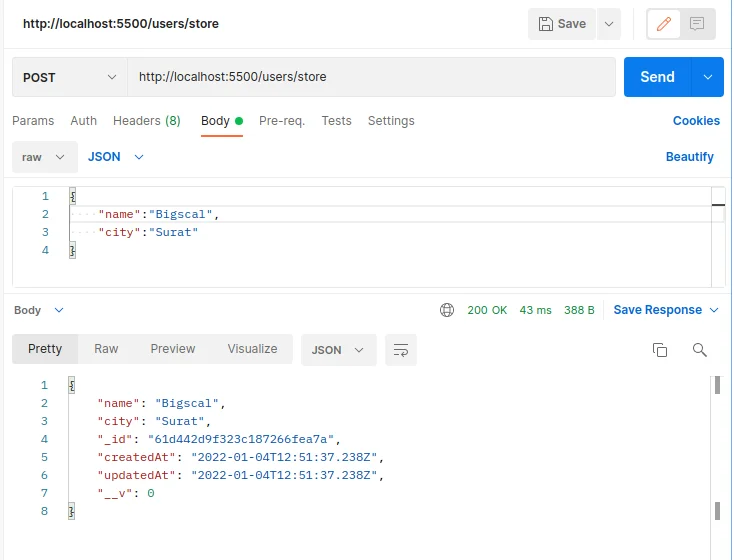
- Store New User To MongoDB
- We are getting the data from the postman we have to do something with it and want to store user data in the database. We will make use of the user.js model we created earlier.
- Now we can add ‘/store’ route in ‘routes/users.js’ file which will use to create new users in the MongoDB database.
-
const USER = require("../models/user"); - Now we can add the /store API like so.
-
router.post('/store',async function(req, res, next) { const user = await USER.create(req.body); res.send(user); }); - That should be enough to store a new user into the database.
- We get the result like this
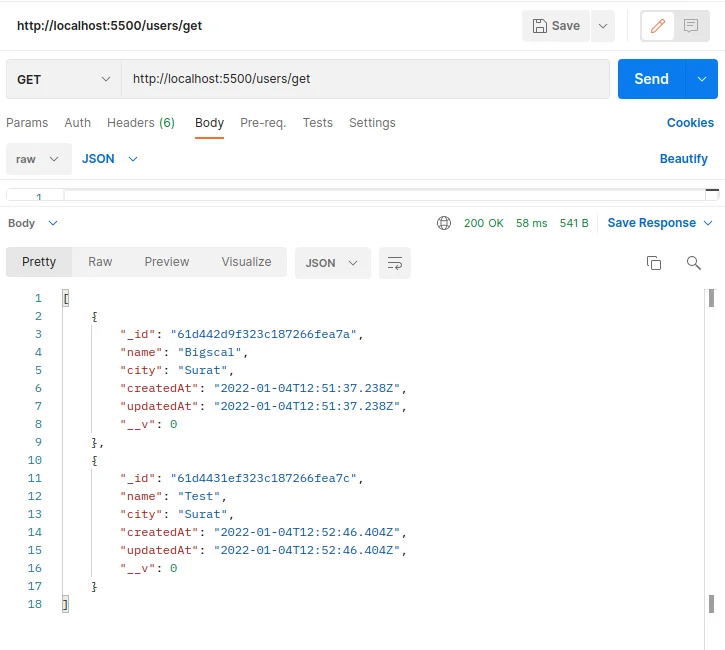
- Displaying users from the database:
- This API is used to get all users which we have created in the database.
- Now we can add the /get like so.
-
router.get('/get',async function(req, res, next) { const users = await USER.find({}); res.send(users); }); -
We get the result like this.
- The final ‘routes/user.js’ file looks like this :
-
var express = require('express');
                var router = express.Router();
                const USER = require("../models/user");/* store users. */
                router.post('/store',async function(req, res, next) {
                const user = await USER.create(req.body);
                res.send(user);
                });
                /* get all users. */
                router.get('/get',async function(req, res, next) {
                const users = await USER.find({});
                res.send(users);
                });
                module.exports = router;
A Part 8: Run docker-compose to build the application.
- Start the application by running the following command.
- docker-compose up
- Our application should be running at ‘http://localhost:5500/’.
- And check Mongo-express UI on ‘http://localhost:8083/’
Part 9: Important docker commands.
- (check all available docker images) docker images
- (run particular docker image, it ready to accept connections) docker run Redis
- (Check running docker image) docker ps
- (running docker image in detach mode) docker run -d Redis
- (To stop detach mode running image) docker stop id_of_image
- (start existing image) docker start id_of_image
- (list all connection images ) docker ps -a
- (change running port 6379 to 3000) docker run -p3000:6379 Redis
- docker logs id/names
- (Use when creating new container only) docker run -d -p3000:6379 Redis
- (Use when we want to run existing container) docker start id
- (provide a list of all available networks) docker network ls
- Connection commands:
- (create a new network) docker network create mongo-network
docker run -p 27017:27017 -d -e MONGO_INITDB_ROOT_USERNAME=admin -e MONGO_INITDB_ROOT_PASSWORD=password –name mongodb –net mongo-network mongo (Run mongo image) - (check a log of newly created connection) docker logs generated_id
- docker run -d -p 8081:8081 -e ME_CONFIG_MONGODB_ADMINUSERNAME=admin -e ME_CONFIG_MONGODB_ADMINPASSWORD=password –net mongo-network –name\
- mongo-express -e ME_CONFIG_MONGODB_SERVER=mongodb mongo-express (Run mongo-express image)
- (for running log screen) docker logs id -f
- docker-compose -f docker-compose.yaml up ( instead of command no. 14 ) (If there is no running connection then it creates default one)
- docker-compose -f docker-compose.yaml down ( instead of command 5)
- (For Use to delete image) docker rmi id
- (Use to delete container) docker rm id
- (Use for the interactive terminal of logs) docker exec -it id /bin/sh

Conclusion
In conclusion, setting up Node.Js With MongoDB Using Docker is very easy. A user needs to follow the proper steps to make things work. Make sure you are following every step attentively. If you are new to it and have not used it before, it is also advisable to seek help from the Node.Js Development Services provider. The experienced developers will be able to help you out at every step. You need to let them know how things can work, and they will help you at every step.
FAQ
Can we use Docker in node JS?
Docker images are those images that have been inherited from other images available. In simple words, there is no need for a user to create their base image, and they can use the official Node.js image having all the tools and packages required to run the respective application.
Can I use MongoDB as an API?
Using MongoDB as API is one of the biggest concerns; it is a pre-configured set of HTTP endpoints. These are in use to read and write data MongoDB Atlas Database. With the help of API, a developer can create, read, delete, update or aggregate documents in the respective database.
Which Node.js image is best for Docker?
When it is about choosing the ideal Node.js Docker image, keep the focus on a slimmed-down version of the operating system. It is based on Debian OS and has a stable and active long-term supporting version of Node.js. Here a user will end up choosing the lts-bullseye-slim Node.
What is Docker in MongoDB?
Among all the NoSQL Databases available, MongoDB is the most considerable one. It is the most famous document-oriented database used by many modern applications. It offers easy scalability and app usage by containers.
Is Docker a host or node?
Knowing that the docker engine and containers run together is pretty straightforward. A docker node refers to the member in the swarm mode cluster. The swarm node is a docker host but does know that not every docker host needs to be a member of the swarm cluster.

