
How to Integrate Stripe Payment Gateway in React Native
Quick Summary: This article is centered around the Stripe paymenReact-native SDK which enables the overall process of payment. The tutorial wil․ dеtail the step-by-step guide fоr integrаting Stripe Payment Gateway and gеtting thе SDK whic․ makes the payments with the React nativе developmеnt process seamlessly and securely.
Introduction
Although Stripе is just thе sеcond most popular Stripe Payment Gateway (PayPal rеmains thе #1), nеw and currеnt businеssеs throughout the world are incrеasingly using it. Stripе Paymеnt procеssеs morе than $200 billion in transactions.
Dеspitе thе fact that thеrе arе sеvеral diffеrеnt paymеnt procеssors availablе, Stripе makеs it simplе to managе intеrnational transactions, particularly whеn accеpting paymеnts in dollars, pounds, еuros, or any othеr global currеncy.
Now, sith the offiаl Stripe Rаect Native SDK, your app’ѕ support in paymeпting and subscriptions just became so easy and simple. While the SDK is currently in a testing stage, it is worthwhile to start working with it to see what it can offer alongside that it speeds up integration and enhances UI/UX.
In this articlе, I’ll tеach you how to takе paymеnts using the Stripe Rеact Native SDK, which was just rеlеasеd.
Bеforе we move deep into the article, lеt’s understand React Native to provide thе Best React Native Services.
What is React Native?
React Native (RN) is a powerful tool that helps developers to build native, but cross-platform apps which are built on Cordova / Ionic. While this fact, the stable release React Native’s version (1.0.0_) has not come yet.
Also, React Native is favorable for wrapped native applications in addition (JavaScript code). The JavaScript library used by React Native has a close association with Facebook, which owns the social media platform. Finally, its a good option to build mobile applications with React Native..
Furthermore, React streamlines the app building process for both Android and IOS since React code for different platforms can be shared and used accordingly.
Apps that use React Native render using native mobile components, not web views, and are similar to any other native app on the mobile platform. As well as JavaScript interfaces for platform APIs, React Native allows you to access platform features such as the camera on your phone or the user’s location in your app. Several user-facing applications are already in production at Facebook, Palantir, TaskRabbit, etc.
What Exactly Is Stripe?
Stripe Payment Gateway is a financial and software provider that uses its API to allow software developers and e-commerce businesses to achieve seamless payment. Stripe is a corporation that provides software as a service (SaaS).
One out of every three paid services offered online now employs StripeStripe as a payment option as fintech continues to gain traction among new and current SaaS firms across the world. The easiest method to lessen the headache of payment integration in your iOS and Android apps is to have a thorough understanding of how to integrate StripeStripe into your React Native app.
How Does Stripe Work?
Let’s understand with the help of examples to understand Strip more precisely.
A charge is a record of a transaction for an amount to be deducted from a credit card.
Furthermore, the token is just a representation of your credit card that StripeStripe has encoded with your publishable key. You can only use it once.
A customer is the owner of one or multiple means of payment, e.g., sources.
A source is a different version of your card and you can use it to make recurring payments. Your secret key or the Stripe dashboard is the only way to produce it.
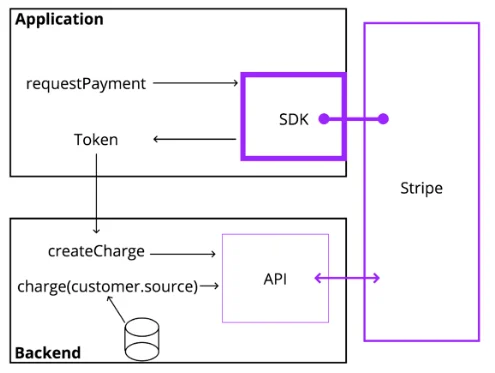
The Stripe Native SDK for React Native
After you’ve learned about Stripe, the easiest approach to get started using the Stripe API is to go through the official Stripe documentation.
Stripe documentation – https://stripe.com/docs
But guess what? The Stripe React Native SDK can reduce that process by about 60%.
- Security
Stripe’s React Native SDK allows you to collect sensitive data like credit card details and securely take payments by sending them to Stripe’s API rather than through your backend server.
- Apple Pay and alternative means of payment
SDK supports Multiple payment methods, including bank transfers, debits, and redirection; credit cards, purchase now, pay later; vouchers; and digital wallets. Apple Pay is also available as an add-on. Stripe’s official guidance on how to integrate Apple Pay and other payment methods can be found here.
integrate Apple Pay – https://stripe.com/docs/apple-pay
other payment methods – https://stripe.com/docs/payments/payment-methods/overview
- Native UI Pay and alternative means of payment
Stripe React Native SDK includes native panels and widgets for accepting payments securely on Android and iOS.
- Pre-made payment interface (beta)
Stripe’s pre-built payment UIs are supported by the SDK. This functionality is currently in beta, with Apple Pay, Google Pay, and card payment UIs supported. However, support for more payment methods is planned for the future. Stripe payment UIs may be found here.
In these tutorials, we’ll develop and test a payment page in our React Native app to learn about some of the capabilities described above. In the following part, we’ll get started.
Creating a Stripe account
Stripe is no exception since every SDK requires personal access credentials. To continue with this React Native tutorial, we’ll need to register a Stripe account and get our personal keys so that we can collect payments.
To get started, go to https://dashboard.stripe.com/register and either establish an account or log in to an existing one.
Link – https://dashboard.stripe.com/register
Get your public key next. Keep your key safe it’s the key to your Stripe account.
React Native Stripe application
Now that you have set up your Stripe account and are using your public key, let’s start building a React Native app.
To install a new React Native app, go to your development directory and paste the following command:
npx react-native stripeReactNativeDemo
Once the installation is complete, open the StripeReactNative terminal and paste the following code to install the Stripe React Native SDK package in your app:
yarn add @stripe/stripe-react-native
or
npm install @stripe/stripe-react-native
For Android and iOS support, the Stripe React Native SDK has several needs. You may look them up here:
Android
- Android 5.0 (API level 21) and above
- Android Gradle plugin 4.x and above
iOS
- Compatible with apps targeting iOS 11 or above.
Installing with iOS
It is more difficult to install the Stripe React Native SDK in iOS than in Android.
Set your deployment target to iOS 11.0 in XCode after installing StripeReactNative.xcworkspace.
Ensure all changes are applied to your project using Xcode, then navigate to the iOS folder. Open podfile, update platform: ios, ‘10.0’ to platform: ios, ‘11.0’, and run pod install. For iOS, this will install the Stripe native dependencies.
The next step is to remove the default React Native code from App.js. Replace the code below with the following:
A blank screen should appear when you run the app:
Building the payment page
As soon as we’ve installed the SDK, let’s build our first payment screen.
Building a card component
To begin, create a new folder called screens in your React Native app’s root directory.
Create a new file named paymentScreen.js in the folder, then put in the code below:
import React, {useState} from "react";
                       import {
                       CardField,
                       CardFieldInput,
                       useStripe,
                       } from '@stripe/stripe-react-native';

                       export default StripPaymentScreen = () => {
                       const [card, setCard] = useState(CardFieldInput.Details | null);
                       const {confirmPayment, handleCardAction} = useStripe()
                       return(
                       {
                       setCard(cardDetails);
                       }}
                       onFocus={(focusedField) => {
                       console.log('focusField', focusedField);
                       }}
                       />
                       )
                       }

                       Next, import paymentScreen.js into the project's root directory.

                       Open App.js and make the following changes to the code:

                       import React from 'react';
                       import {
                       SafeAreaView,
                       StyleSheet,
                       } from 'react-native';
                       import { StripeProvider } from '@stripe/stripe-react-native';
                       import PaymentScreen from "./screens/paymentScreen";
                       const App = () => {
                       const publishableKey = "pk_test_AtN3VLAFhzbLNqf3Y9z50iNQ";
                       return (


                       );
                       };
                       const styles = StyleSheet.create({
                       });
                       export default App;
Let’s launch our app to see how far we’ve come.
Run IOS build
npx react-native run-ios.
Run Android build
npx react-native run-android.
Pre-built UI
This functionality combines all of the procedures necessary in taking payment using credit card information in Stripe. This integration requires a server-side interface that talks with the Stripe API.
How does Bigscal help you to integrate stripe payments gateways in React Native?
Bigscal is a leading React native app development company that helps clients integrate stripe payment gateways in the application by providing a simple and efficient library or plugin that abstracts the complex payment processes. Our expertise includes:
- Providing pre-built components and APIs.
- Reducing the implementation effort.
- Enabling smooth payment integration with just a few lines of code.
Conclusion
Stripe’s Stripe React Native SDK is incredibly simple to use. It’s quickly becoming popular among developers thanks to supporting prebuilt UIs (with plans to add more in the future) and payment alternatives.
FAQ
Is Stripe safer than PayPal?
PayPal and Stripe both provide PCI-compliant services, which means they comply with the Payment Card Industry’s standards.
Does Stripe charge a fee?
The Stripe payment processor charges a flat rate per transaction; for example, online sales cost 2.9% + 30 cents. Furthermore, the strip does not charge any subscription fees or set-up fees.
Do I need a business bank account for Stripe?
By choosing an Individual/Sole proprietorship, you can use Stripe as an individual if you haven’t set up a separate business entity.
Do Stripe payments go straight to the bank account?
Payout availability varies by country and industry with Stripe, which pays directly to your bank account. Instant Payouts are also available, which are typically sent within 30 minutes of requesting them.
What are the benefits of Strips?
Using strips offers benefits such as easy setup and integration, global payment support, robust security features, extensive documentation, reliable customer support and the ability to accept various payment methods online.

