
How to Create Application in React Native with Node.js backend and GraphQL
Quick Summary: To start building an application with React Native with a Node.js backend and GraphQL, therefore, you are meant to set up the environment of React Native, set up a Node.js backend, integrate GraphQL, and connect frontend to the backend. Tools that can be put to use include GraphQL for testing and debugging GraphQL queries. The fusion provides the possibility of producing applications that are cutting-edge as well as high-performance mobiles.
Introduction
You need clarification as to whether to move towards fast application development with the backend. What would you choose for the framework or technology? Therefore, you are justified to be here. An application by React Native based on the Node.js backend is an ideal combination for software development.
Fast and effective development can be accomplished by making a mobile app on React Native.
We will explain every topic with an example. At the same time, we are going to be using a backend to allow you to build a cross-platform application.
⇒ In this example, we are going to use React Native (for the app), Node.js (the backend API), and MongoDB (for the database).
So, hold on and read how you can make an application in React Native with a Node.js backend and GraphQL. In addition, you can also make an application in React Native with our React Native Development Services.
What Is React Native?
For developing an application in React Native you must know all about it. But As a tech enthusiast, you all already know what React Native is, and If you are new to React Native, then learn it from the React Native development page.
Set Up An Environment For React Native
To begin building an application in React Native you must set up an environment first. And the easiest way to set up an environment for React Native is by following the steps that have been described by React Native’s official page for Environment setup.
Why React Native?
Here are many benefits of building an application in React Native, some of them are below:
Cross-platform Versatility:
By using React Native, a single codebase for native applications of the iOS and the Android platform is possible. It drastically reduces the time required for development and saves time and money.
Improved Native-Like Performance:
Offering native components, React Native lets users take outstanding performance for the application which, in turn, provides consumers with fluid experience, and a more responsive feel.
GraphQL-enabled Data Fetching:
GraphQL enables your application to make data fetching simple, allowing users to request only the needed data. Data efficiency will be minimized, thus producing a better performing app.
A thriving ecosystem and community:
React Native, Node.js, and GraphQL have very lively and helpful communities. You will, therefore, enjoy many libraries, resources, and tools that always update and support your project.
Accelerate Development Cycles:
You can launch your application within a short time with the allied power of React Native and GraphQL and flexibility on the side of Node.js.
By embracing this powerful technological stack, you can build up a React Native app that would be efficient and scalable. And it also supports a diverse user base on multiple platforms.
What is Node.js?
Node.js is a powerful open-source JavaScript runtime. The aim of Node.js is to allow programmers to run JavaScript code outside of a web browser-that makes it particularly well-suited for server-side applications.
Designed to be event-driven, non-blocking architecture, this framework is what enables it to work with multiple connections and I/O operations most effectively. Node.js has lately received much attention in building web servers, APIs, and a long series of applications due to its light and scalable features as well as its strong library ecosystem.
Why Node.js?
It is truly great for designing applications in React Native with a Node.js backend and GraphQL when it comes to designing. Because of adaptability, scalability, and ease of connection with JavaScript, it is the perfect framework to use in developing reliable and practical mobile apps. All things will be perfectly done very quickly with hiring Node.Js developers. Alongside that, there are numerous reasons why selecting Node.Js for the reason of running mobile application development.
It has an event-driven, non-blocking architecture which serves multiple concurrent requests very efficiently. This kind of functionality allows real-time data syncing, thereby making overall usability of services for developing React Native apps better.
Using Node.js with React Native means it is easier to share code between the front and backend, thus saving time from lengthy development procedures. Using the same ecosystem and language streamlined the development process and therefore improved team communication.
Among other factors, Node.js is also very famous for its package management called NPM, offering thousands of open-source libraries and modules. This massive kingdom offers ready solutions to the developers, which accelerates development and resolves some issues quite frequently.
Lastly, developers can use GraphQL with Node.js together for truly engaging data fetching, providing more flexibility and reducing over-fetching concerns sometimes faced in conventional REST APIs. It then leads to quicker data retrieval and less network utilization which eventually improves the performance of React Native apps.
How to create a basic API in Node.Js backend?
You would read this with an example. For now you can understand this by clicking there.
Set up Environment for Node.Js
I hope you are also ready with the Node.Js environment setup. It only requires installing node & npm, click here to know more.
Set up Environment for MongoDB
Visit MongoDB’s official website & follow the steps to install MongoDB in your local PC, or you can use the cloud database of MongoDB Alas. Visit:
What is GraphQL?
GraphQL is an open-source data query and manipulation language for APIs and a runtime for fulfilling queries with existing data.
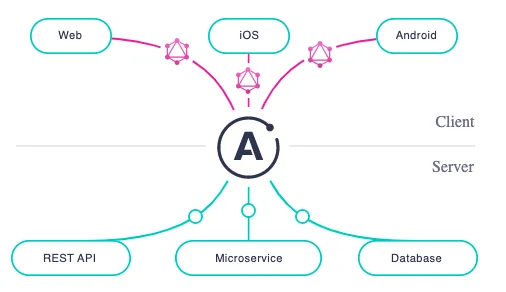
In simple words, if I explain, GraphQL acts as a data carrier between the Backend & Frontend, which we’ll develop in Node.Js for the API & React Native for the Application normally, but to call Rest APIs we will use GraphQL instead of calling manually with Axios or fetch.
Start MongoDB, Create backend project, Install required libraries & Implement Backend code
Now we have set up all the environments. So now we are ready to start.
Here we are going to make a complete frontend & backend of a React Native app. So first, we will start developing some basic backend APIs for Book & Author. We are not going to do complicated things. So, let’s get started. So let’s begin.
Now, in the following subsections, I assume that you have completed all the setup. We will then see how to run the MongoDB on the local machine (I am doing all things in MacOs)
Step-1: Step-1:Open the terminal and fire the below command in the MongoDB directory.
cd /usr/local/var/log/mongodb [if Intel Processor]

                         cd /opt/homebrew/var/log/mongodb [if Apple M1 Processor]
Step-2: Fire the below command to start the MongoDB database server locally brew services start [email protected] After your work is done, if you want to stop MongoDB then fire the below command in the same path brew services stop [email protected]
Step-3: Here we will start to create APIs in Node.Js & Connect the MongoDB database.
-
- Create a folder for your project I named “LibraryM_backend”, you can name anything as you want.
- Open that folder path in terminal & fire command npm init -y. After this command, you can see a package.json file in your folder. And after that, we will install all required libraries (npm packages)
- We will install the below packages.
- npm install mongoose
- npm install express
- Create an index.js file in the root directory of a project like “/LibraryM_backend/index.js” and paste the following code.
-
const express = require('express'); const mongoose = require('mongoose'); const app = express(); //Establish database connection const connectDb = async () => { await mongoose.connect('mongodb://localhost:27017/book_db', { useUnifiedTopology: true, useNewUrlParser: true }).then(() => { console.log("DB connected successfully...."); }).catch(() => { console.log("DB connection failed..."); }) } connectDb() //listening server on port 4000 app.listen(4000, () => { console.log("Server is running on port: 4000"); }) - Mongoose. Connect is connecting to the “book_db” MongoDB database. If you already create that, combine it with the existing one; otherwise, create a new one & then click “mongodb://localhost:27017/book_db” as a connection string to connect with the MongoDB database.
- Run command npm start & you will find in console “Server is running on port: 4000”.
- Here every time we will need to start the server after changes to get reflect changes, to avoid this we need to install a dev dependency nodemon: npm install –save-dev nodemon
- Change the following code in package.json
-
"scripts": { "test": "echo \"Error: no test specified\" && exit 1", "dev": "nodemon server.js" }, - Now we are done with the database connection & server started.
Integrate GraphQL in backend side (Using Apollo Server)
After we will install npm for GraphQL
npm install apollo-server
npm install graphql
What is Apollo Server?
Apollo Server is an open-source, spec-compliant GraphQL server compatible with any GraphQL client, including Apollo Client. It’s the best way to build a production-ready, self-documenting GraphQL API to use data from any source.
In simple words, Apollo Server is used on the Backend Side and Apollo Client on the Frontend Side(React JS, React Native, etc.). So, through this Apollo Client, you can access the backend APIs.
Create folder structure for backend
I will create a folder structure like below. You can create according to your convenience.

Configure Apollo Server, Connect to DB & Start Server
Now time to integrate GraphQL with backend in index.js file
const express = require('express');
                         const mongoose = require('mongoose');
                         const { ApolloServer } = require('apollo-server-express');
                         //Resolvers
                         const BookResolver = require('/src/resolvers/BookResolver');
                         const AuthorResolver = require('/src/resolvers/AuthorResolver');
                         const UserResolver = require('/src/resolvers/UserResolver'), ;
                         //Type Defs
                         const AuthorTypedef = require('/src/typesDefs/AuthorTypeDef');
                         const BookTypedef = require('/src/typesDefs/BookTypeDef');
                         const UserTypedef = require("./src/typesDefs/UserTypedef');

                         // function to create graphql apollo server
                         async function startServer() {
                         const app = express();
                         const apolloServer = new ApolloServer({
                         typeDefs: [BookTypeDef, Author TypeDef, UserTypeDef],
                         resolvers: [BookResolver, AuthorResolver, UserResolver),
                         context: async ({ reg }) => {
                         },
                         });
                         // Start grapql server
                         await apolloServer.start();
                         // Apply express (app) as middleware
                         await apolloServer.applyMiddleware({ app: app });
                         // MongoDb database connection
                         await mongoose.connect('mongodb://localhost:27017/book_db', {
                         useUnifiedTopology: true,
                         useNewUrlParser: true
                         })
                         console.log("Mongodb connected ........");
                         app.listen(4000, () => {
                         console.log("Server is running on port: 4000");
                         startServer();
                         })
                         }
                         startServer()
Explanation of GraphQL Keywords
In the above code, you can see how you can configure and start GraphQL
I think you are familiar with express & mongoose, and now ApolloServer. We use three keywords here “typeDefs” & “resolvers”, the next “context” that will need to be explained.
typeDefs: Document or documents that represent your server’s GraphQL schema.
That needs to pass in typeDefs props while creating ApolloServer. A typeDefs looking like
const { gql } = require('apollo-server-express'),
                         const BookTypedef = gql`
                         # AuthorInput
                         type Author {
                         id: ID
                         authorName: String
                         description: String
                         email: String
                         }
                         # Book
                         type Book {
                         id: ID
                         title: String
                         bookescription: String
                         publishedYear: Int
                         author: Author,
                         bookImage: File
                         }
                         type Query {
                         getAllBooks: [Book]
                         getBooksByAuthor(id: ID): [Book]
                         getSingleBook(id:ID): Book
                         }
                         input BookInput {
                         title: String
                         bookdescription: String
                         publishedYear: Int
                         author: String
                         }
                         type Mutation {
                         createBook (book: BookInput): Book
                         updateBook(id: String, book: BookInput) : Book
                         deleteBook (id: String): String
                         deleteAllBook: String
                         }
                         `
                         module.exports = BookTypeDef
Explanation:
- “Mutation”:
- Mutation queries modify data in the data store and return a value.
- “resolvers”:
- A resolver is a function that’s responsible for populating the data for a single field in your schema.
- “Query”:
- A GraphQL query is used to read or fetch values, which means to perform the “GET” method, we can use query.
- “Book” & “Author”:
- “Book” & “Author” are types that contain which fields are allowed to send as a response. It is user-defined, & we need the “type” keyword to define it.
- “BookInput”:
- “BookInput” is an input type that contains what fields we are going to receive in the request body.
- Note: If we declare any field as “äuthorName”: String! It indicates the required field.
-
// BookModal that defined for MongoDB Book Schema. const Book = require('../models/BookModal'); const BookResolver = { Query: { getAllBooks: async (parent, args, context, info) => { return await Book.find().populate("author"); }, getSingleBook: async (parent, args, context, info) => { return await Book.findById(args.id).populate("author"); } getBooksByAuthor: async (parent, args, context, info) => { let books = await Book.find({ author: args.id }) return books; } } Mutation: { createBook: async (parent, args, context, info) => { const book = new Book(args.book); await book.save(); return book; } updateBook: async (parent, args, context, info) => { const { id } = args const book = await Book.findByIdAndUpdate(id, args.book); return book; } deleteBook: async (parent, args, context, info) => { const { id } = args await Book.findByIdAndDelete(id) console.log("Book deleted successfully"); return "Book deleted successfully"; } deleteAllBook: async (parent, args, context, info) =>{ await Book.deleteMany() return "Books deleted successfully"; } }} module.exports = BookResolver - Explanation:
- It is a resolver for “Book”, in this, we defined Query, & Mutation’s methods that were declared in typeDefs. You can understand better by looking at the above image, let’s see.
-
Mutation: { createBook: async (parent, args, context, info) => { const book = new Book(args.book); await book.save(); return book; } } - All parameters (parent, args, context, info) are predefined & are explained very well in the doc: https://graphql.org/learn/execution/
- The operations which were performed in the controller to insert or update data into the database, perform here in the resolver for particular operations.
- : Hereafter save data into the database, it is returning a “book” object & “book” object may have many fields value, but because of graphQL, it will check “Book” type in typeDefs & return only those filed that will match in Book type.
-
Query: { getAllBooks: async (parent, args, context, info) => { return await Book.find().populate("author"); } } - Here all methods that are declared in typeDefs’ Query are defined. It performs fetch operations & returns “Book” objects with only those fields which are declared in “Book” type in typeDefs.
- “Configure GraphQL Apollo Server”:
- : After creating typeDefs & resolver, We will create Apollo Server & start that.
-
const apolloServer = new ApolloServer({ typeDefs: [BookTypeDef, Author TypeDef, UserTypeDef], resolvers: [BookResolver, AuthorResolver, UserResolver), context: async ({ reg }) => { }, }); - in the above image, you can see “context”. This means inside that we can verify user credential & header’s auth token before going in the resolver, & can throw Authentication error from here, and in the resolver, there is a parameter “context” that contains login user information. We can throw errors if not get user data.
Creating React Native project & Implement GraphQL (Apollo Client)
- Step-1: Now finally, We are done with the backend all stuff
- Create a React Native app : npx react-native init LibraryM_frontend
- Step-2: Open App in VS code & install required npm packages
- For Navigation, you can use the react-navigation library:
- npm install @apollo/client graphql
There are two libs needed to install “@apollo/client” & “graphql”.
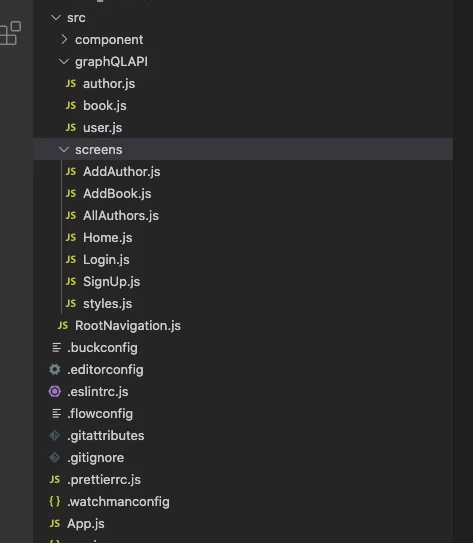
- Step-3: You can create a folder structure like below.
Create folder structure for React Native app (Frontend)
Write queries & mutations in the book.js file, that will be used to fetch & update data.
The below image represents “query” which means fetch operations.
Integrate & Configure GraphQL in React Native App (Apollo Client)
import { gql, useMutation } from '@apollo/client'

                         // Queries
                         const GET_ALL_AUTHOR = gql`
                         query getAllAuthors {
                         getAllAuthors {
                         id
                         authorName
                         description
                         email
                         }
                         }
                         `;

                         const GET_SINGLE_AUTHOR = gql`
                         query getSingleAuthor {
                         getSingleAuthor {
                         id
                         authorName
                         description
                         email
                         }
                         }
                         `;
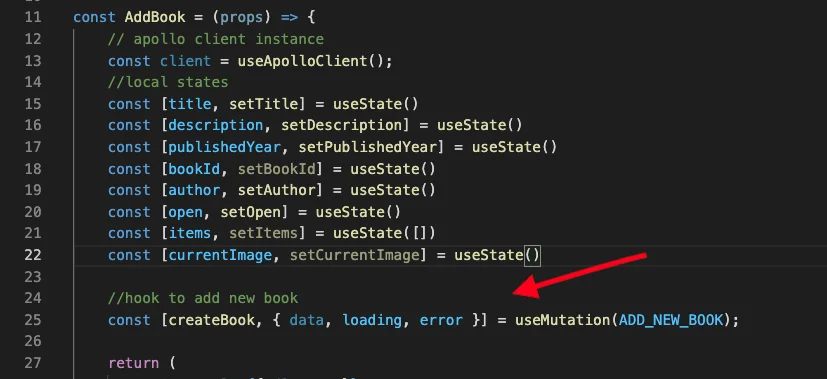
The below image represents the insert operation, similarly, we can write for the update & delete.
import {gql} from '@apollo/client'
                         // Mutations
                         const ADD_NEW_AUTHOR = gql`
                         mutation createAuthor($authorName:String, $description:String, $email:String) {
                         createAuthor(author:{
                         authorName: $authorName,
                         description: $description,
                         email: $email
                         }) {
                         id
                         authorName
                         description
                         email
                         }
                         }
                         `;

                         const UPDATE_AUTHOR = gql`
                         mutation updateAuthor($id: String, $authorName:String, $description:String, $email:String) {
                         updateAuthor(id:$id, author:{
                         authorName: $authorName,
                         description: $description,
                         email: $email
                         }) {
                         id
                         authorName
                         description
                         email
                         }
                         }
                         `;

                         const DELETE_AUTHOR_BY_ID = gql`
                         mutation deleteAuthor($id: String) {
                         deleteAuthor(id: $id)
                         }
                         `;

                         const DELETE_ALL_AUTHOR = gql`
                         mutation deleteAllAuthor {
                         deleteAllAuthors
                         }
                         `;

                         export {
                         GET_ALL_AUTHOR,
                         GET_SINGLE_AUTHOR,
                         ADD_NEW_AUTHOR,
                         UPDATE_AUTHOR,
                         DELETE_AUTHOR_BY_ID,
                         DELETE_ALL_AUTHOR
                         }
Configure Apollo client in App.js file
import React from 'react';
                         import { ApolloClient, createHttpLink, InMemoryCache, ApolloProvider} from '@apollo/client';
                         import RootNavigation from './src/RootNavigation';

                         //create http link based on base url
                         const httpLink = createHttpLink({
                         uri: 'http://192.168.1.34:4000/graphql',
                         });

                         //Create apollo client object
                         const client = new ApolloClient({
                         link: httpLink ,
                         cache: new InMemoryCache(),
                         // credentials:'include'
                         });

                         export default function App() {
                         return (
                         <ApolloProvider client={client}>
                         <RootNavigation />
                         </ApolloProvider>
                         )
                         }
- Explanation:
- In the above image “http://192.168.1.34” is the IP of my backend server PC & “4000” is port, “/graphql” is the default URL that is automatically added if you don’t specify in “apolloServer.applyMiddleware({})” “path” param ( It is part of backend )
-
await apolloServer.start(); await apolloServer.applyMiddleware({ app: app, path:"/graphql" }) - <ApolloProvider client={client}/>: That wraps our root component, Hence all child components or screens can access the “client”‘s instance & using that we can perform operations of fetch & update.
-
import React, { useState } from 'react' import { useMutation, useQuery, useApolloClient } from '@apollo/client'; import { View, Text, Flatlist, SafeAreaView, Alert, Image } from 'react-native' import { GET_ALL BOOKS }_from '../graphQLAPI/book'; export default function Home (props) { // local states const_[books, setBooks] = useState( []), // get apollo client instance const client = useApolloclient(); //fetch book data const { loading, error, data } = useQuery(GET_ALL_BOOKS), // delete book data const [deleteBook, { data: deletedData, loading: deleteLoading, error: deleteError }] = useMutation (DELETE_BOOK_BY_ID); return( <SafeAreaView style={{ flex: 1, backgroundColor: "#E8F3F3"}}> <FlatList data={data?.getAllBooks || []} // data.getAllBooks returns all book data renderItem={_renderItem} keyExtractor={(item, index) => index.toString() } refreshing={true} /> </SafeAreaView> ) } - “useQuery()”: Above example fetch books data from backend using “useQuery()” hook.
- And “data.getAllBooks” contains all book data here “getAllBooks” is clear in /graphQLAPI/book.js
-
// Queries const GET_ALL_AUTHOR = gql` query getAllAuthors { getAllAuthors { id authorName description email } } `; - “useMutation()” : This apollo client hook is used to perform insert, update, delete operations. The below image represents how that works
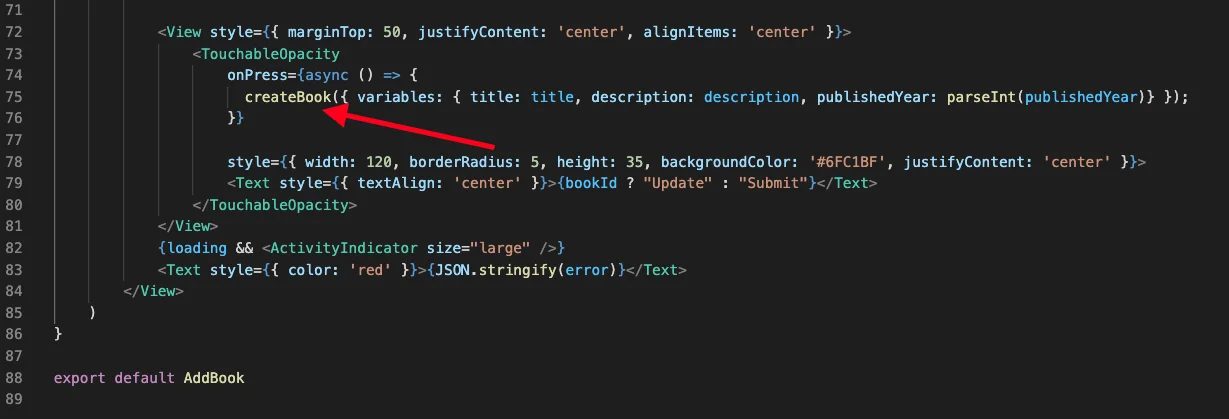
I hope the above code makes it clear to understand how we can insert data using the “useMutation” hook.
Troubleshooting Common Issues
1. Identifying and resolving common React Native errors
Issues with the application development service involve unexpected behaviors, crashes, or unresponsive components. First and foremost, the developer should go through the logs and console output of the application for error messages that can solve these problems. Such communications often give crucial leads about the nature of the case. Among the most frequently observed errors include syntax errors, missing dependencies, and problems with native modules.
In such cases, dependency check, package update, and application testing on various hardware or simulators can all contribute toward coming up with the root cause of the problem. Furthermore, through tools like React Native Debugger or Reactotron, one gains a deeper understanding of the state and behavior of the application in order to address the issue better.
2. Debugging common GraphQL and Node.js issues
These problems could result from issues in GraphQL queries and Node.js server requests. One of the initial steps for debugging such an error is to carefully review the query and mutation requests and then contrast them with the schema of the server. The resolvers and schema definitions must mirror an appropriate data structure.
Useful tools for testing and debugging GraphQL queries may include GraphiQL or GraphQL Playground. These technologies enable a more informative and participatory method of querying examinations.
Checking server logs may also help identify performance glitches and other faults in the Node.js backend. Server logs may give good clues on how to solve problems or make GraphQL run better.
3. Troubleshooting server-client communication problems
Common issues in such applications occur due to communication errors between the client at React Native and the server at Node.js. Test this out: generally, a network check between these two components, and ensure that, from the client side of the application, the server is running and reachable.
That the server can’t be accessed by the client sometimes also causes CORS-related problems. Configure the settings on the server in order to allow all origins necessary for solving this problem.
In addition, network debugging tools are available, such as Charles Proxy or Wireshark. These can track network requests and their responses. The use of such technologies makes it relatively easy to find and understand communication problems, thus facilitating the solution of the root problems.
How can Bigscal help Create an Application In React Native With Node.Js Backend And GraphQL?
If you are still confused about how to begin building an application with React Native and a Node.Js backend combined with GraphQL, you can reach us.
Our developers’ expertise leads to a very scalable, high-performance backend with Node.js. The full utilization of scalability and speed is done for top-notch performance.
Integration of GraphQL allows for the efficient fetching of data, there is elimination of issues related to over-fetching and under-fetching for optimization in your app’s performance.
Bigscal offers end-to-end development on the full scope of development- from ideation to deployment-for tailored solutions that perfect exactly what you need, based on React Native development services.
Experience the tremendous power of React Native with Node.js incorporated in it, coupled with flexibility in GraphQL, all perfectly brought together with expertise from Bigscal to help your app development journey make no mistakes.
Conclusion
It makes fetching & updating data pretty easy & efficient with GraphQL. It is quite easy to integrate into your app. And it also gives you the privilege to utilize the benefits of GraphQL features. So, start working on your application development project today.
At Bigscal Technologie, Hire React Native Developers & Offshore React Native Developers And Save Up To 60% On Costs And Time With No Hiring Fees.
FAQ
How does React Native interact with Node.js?
The frontend is React Native and the backend is Node.js, that powers the API, allowing the app to communicate with the server in a real smooth way.
Why Node.js as a backend?
Node.js has strength in high scalability, non-blocking I/O, and numerous available libraries that leave it ideal for building fast and responsive APIs .
How does GraphQL help the application?
GraphQL reduces the fetching of data, as it will save network overhead, and will allow client consumers to ask for only the data that is needed, thereby making the applications faster.
Can I reuse React Components from a web app in a React Native application?
In general, yes! Most React components can be reused in React Native, which makes development easier and maintains consistency.
Is React Native suitable for complex applications?
Thanks to the flexibility of React Native and the large community surrounding it, it can be utilized for creating complex, feature-complete applications.

