
How to Implement Next JS Server Side Rendering
Quick Summary: Do you want to give your users a fast and unstoppable web experience? If yes then you must use Next.JS Server-Side Rendering. This will help you to lightning-fast web experiences. With SSR, the content of your application is pre-rendered on the server, improving SEO, performance, and user experience. But how? read this blog and understand how? We explain the whole process to help you!
Introduction
Enhance your web app by implementing NextJS Server Side Rendering. SSR has become an essential part of modern web development. It offers many benefits in terms of productivity, SEO, and user experience.
Next.Js, the popular React framework, provides a simple solution to use SSR. But what is SSR and How can I implement it?
SSR is a method for generating static file with HTML pages on the server before sending them to the client. Next.js, the React framework, gives developers a flexible workflow for server-side rendering. It enables them to easily build high-performance and fast web applications. Additionally, it help to build a apps that load faster and rank higher in search engine results.
So, if you want to change your boring web apps with faster and immersive apps, then read this blog post. We’ll cover topics like developing Next.js applications, developing methods for server-side rendering, importing dynamic data from external sources, optimizing performance, and solving common challenges along the way.
Read on!
What is Next JS Server Side Rendering (SSR)?
Before diving deeper let’s first understand what is SSR.
So, basically Next.js Server Side rendering (SSR) is a technique. This technique used in web development to enhance the performance and user experience of React applications. SSR requires preliminary HTML content that can get render on server before sending it to client browser. Additionally, it is one of Top Next.JS Features.
Therefore, it means that if a user requests it a page the server API or data from there the database. It dynamically generates the included HTML, and returns all rendered pages to the browser.
Why Next.JS: Benefits Of Server Side Rendering In Next.JS
You must be wondering of why you must choose Next.JS for SSR. Here are it’s benefits. Have a look:
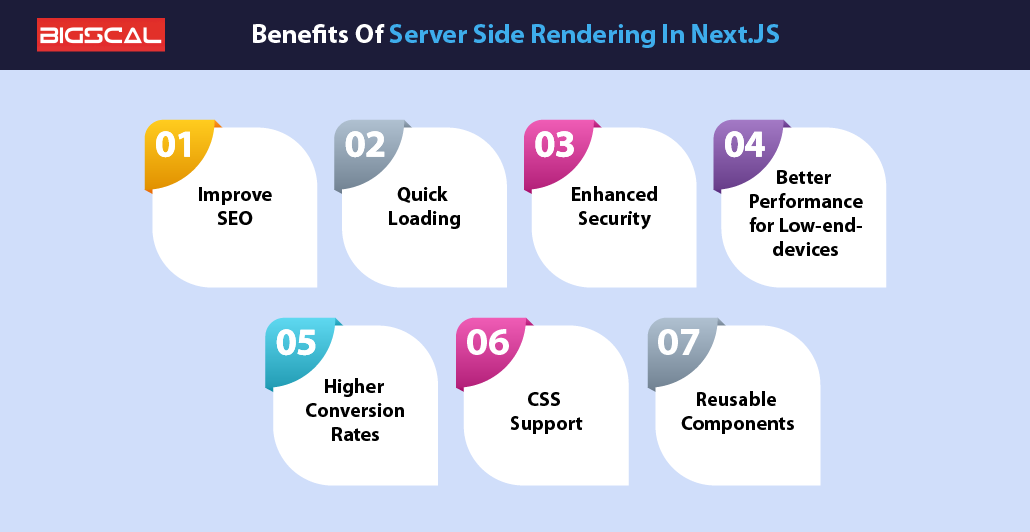
Improve SEO
The SSR pages in Next.JS helps to improve search engine optimization. As it generating dynamic pages on the server, so that the search engine can crawl and index the content easily. Additionally, Server-side rendering enables search engines to access fully rendered with JS routing HTML content.
These includes metadata and links, increasing visibility and ranking. Therefore, it means that your website will show up more in search engine results and drive more organic traffic to your site.
Quick Loading
With Next.JS server side rendering, you can speeds up loading time. It boost the loading times by previewing pages during build or at runtime. This ensure that users do not need to wait for a long time when they access your site. It results in higher user satisfaction and engagement. By serving well-designed and organized content, Next.js reduces latency and provides visitors with a smooth browsing experience.
Enhanced Security
Next.js enhances security by providing built-in features such as automatic XSS (Cross-Site Scripting) and CSRF (Cross-Site Request Forgery) protection. Additionally, server-side rendering limits the vulnerabilities of exposing the code and data required on the client-side pre rendering and dynamic routes. Therefore, it helps to minimize security risks and protects your website and user from potential threats and attacks.
Better Performance for Low-end-devices
Next.js optimizes resource consumption and improves performance for less powerful devices by reducing client-side processing. With SSR the server delivers HTML content that is fully defined. It is for a processing capacity and memory less on the user’s device. It becomes necessary. Hence, this allows for faster loading and more efficient browsing for even low-capacity devices or slow internet connections.
Higher Conversion Rates
Web pages load faster in SSR with dynamic rendering which can increase conversion rates. When users can access content quickly on the site and are more likely to complete desired actions. These actions may include, making a purchase or signing up for a service, etc. Faster loading times can reduce bounce rates and increase engagement. Moreover, it leads to higher conversion rates.
CSS Support
The Next.JS Server Side Rendering provides developers a CSS-built-in support techniques. This support improves the visual interface and user experience of the website. This means that users won’t get a flash of unstyled content (FOUC) when the page loads.
Reusable Components
Next.JS Latest Version allows developers to create reusable components that can be shared across different pages and can be reused even in projects. This encourages code reuse, simplifies development. Additionally, it makes it easier to maintain and update websites over time. By properly managing components, developers can create scalable and flexible applications.
Process to Implement Next.JS Server Side Rendering
There are several steps to implement server-side rendering (SSR) in Next.js. These steps are:
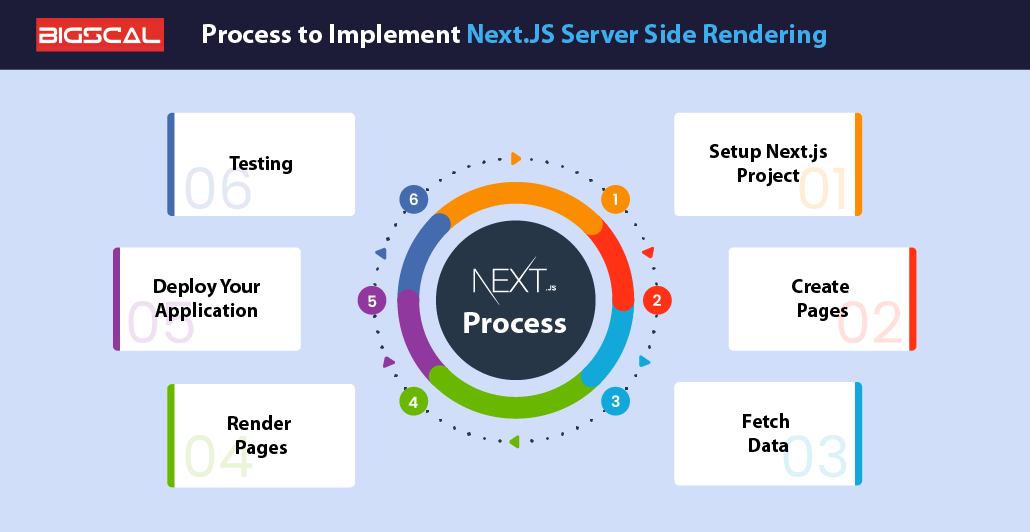
Setup Next.js Project
To setup the project first you need to install Node.JS on your system. Now, you can create a new Next.js project by running the following command in your terminal.
npx create-next-app@latest my-next-app
cd Me-back application
npm run dev
This command creates a new Next.js project in the my-next-app directory. And it starts the development server.
Create Pages
Next.js follows a JS file-based paths system. In this system each file in the page directory corresponds to a path in your application. Hence, to create a new page, create a new file in the page directory with the JS extension. For instance, if you wanted to create a page for the /about path, you would create an about.js file in the pages directory.
// pages/content.js

function GetPage ()

{ return <div>aboutpage</div>;}

export default AboutPage;    // pages/content.js
    function GetPage ()
    { returnaboutpage

;} export default AboutPage;
By configuring Next.js workloads and streaming pages using a file-based routing system. You can easily use SSR without having to manually deal with complicated server-side logic.
Fetch Data
The Step is to fetching the data. Next.js has an built-in SSR feature and it allows you to fetch data for your pages at runtime, whether it’s an API keys, a database, or another data source. This is important for dynamic content. To fetch requests data all you need to use getserversideprops or getStaticProps functions.
    export async function getserversideprops(context) {
    // Fetch the data from the API
    const res = await fetch('https://api.example.com/data');
    const data = await res.json();
    // Pass data as props to parts of the page
    return {
    props: { data },
    };
    }
This function runs on request on the server and returns data as props to the page component. You can then access this data in your backend component using props.
Render Pages
Next.js offers server-side rendering (SSR), which means that pages are pre-rendered on the server before being delivered to the client. This allows you to load the first page faster and ensures that search engines can index your content properly.
To render pages in Next.js, you create React and Next components in the page directory. These objects represent pages of your application
import React from 'react';

function homepage ({ data }) { .

  return (

    <div>

      <h1>home</h1>

      <p>Data: {JSON.stringify(data)}</p>

    </div>

  );

}

export async function getServerSideProps(context) {

  // Get the data from the API

  const res = await fetch('https://api.example.com/data');

  const data = await res.json();

  // Pass data as props to parts of the page

  return {

    props: { data },

  };

}

export default function HomePage;
With the export default function home Next.js displays the React component associated with that page on the server When a user requests a page. Additionally, it delivers the resulting HTML to the client. It ensures a smooth and SEO-friendly experience with static generation or static site generation.
Deploy Your Application
Deploying your Next.js application requires that you make it available online so that users can access it. This process usually involves hosting your application on a server that is accessible via the Internet. To deploy your Next.JS App you need to follow following steps:
Prepare your application for deployment:
First of all you must prepare your app like you need to assure that your application is properly configured and ready to be executed.
Choose a deployment platform:
Having said that, selecting host which supports Next. is also an issue you should consider. js applications. But the two leading providers that you can consider are Vercel and Netlify. as easy installation processes with features like automatic build and continuous deployment is one thing they do attribute.
Connect your code repository:
The following step is Connect your code repository (which is). g. For instance, you can integrate effective continuous delivery tools such as Jenkins and Build servers with your preferred deployment platform. This is a capacity that the platform is able to incorporate new changes whenever you update your repository by push.
Configure deployment settings:
Depend on what type of deployment you want to do, set any configuration option as required, say custom domain, environment variables or any command for a build.
Deploy your application:
Commence the proceeding either manually or automatically, depending on rules of your deployment platform. Once deployed, your Next. Whether Js application development should be prioritized over native and web app development is determined by the user`s available channels of internet access.
    Use Code:

    // Example deployment script for Vercel
    // vercel.json
    {
    "version": 2,
    "builds": [
    {
    "src": "next.config.js",
    "use": "@vercel/next"
    }
    ]
    }

    # Example command to deploy to Vercel
    vercel --prod
Testing
Testing your Next. js application is important. This makes sure it’s compatible with other issues of software and ensures its workability, stability and reliability. It also allows spotting and fixing a possible error or defects. From this point, you may view the entire test configuration for Next. js application.
Unit testing:
Add test cases to cover single units of your application, for example, components, functions, or modules. Unit-level tests are the first line of defense, and you should build a strong wall before proceeding to complex tests. Unit tests are tailored for each particular part of your application to examine how it works separately setting the expectations.
Integration testing:
Test the responsiveness between the different components or units of the application. The interaction of experiments species that these factors not only complement, but also produce the accounted results which are probable.
End-to-end (E2E) testing:
Implement the tests which act as a potential users but simulate the interaction of application. E2E testing uses mostly automated browser testing to prove the whole experience as the user navigating through the initial page to the links (if any) and even to the operating system.
Performance testing:
Check how your Next. When we debug our js app under different conditions (e.g port traffic types and mobile operating systems), we are able to identify and fix any bugs within our application. Performance testing consists of a continuous process of making your application more speedy and responsive by identifying potential vulnerabilities
Accessibility testing:
Conduct accessibility testing in order to meet the safety standard of Next. to this extent, even users with disabilities can easily use the JavaScript application. It involves features such as the implementations using keyboard and screen readers, and standard ARIA attributes.
    // Example unit test using Jest
    // myComponent.test.js
    import { render, screen } from '@testing-library/react';
    import MyComponent from '../components/MyComponent';
    test('renders MyComponent correctly', () => {
    render();
    const linkElement = screen.getByText(/hello world/i);
    expect(linkElement).toBeInTheDocument();
    });
    # Example command to run tests using Jest
    npm test
How Bigscal Technologies Can Help You In Implementing Next.JS Server Side Rendering
If you need a technical assistance to implement Next.JS Server Side Rendering then we are here to help you.
With our expertise, we ensure that your website delivers fast performance and the best user experience. Leveraging Next.js SSR, we power your website with lightning-fast loading times. It help you to improve SEO rankings, as it provides pre-featured pages served directly from the server. This means your users get faster page loads, reduce bounce rates, and increase engagement. Additionally, Our experienced team at Bigscal ensures a best process for implementing SSR with Next.JS.
So, contact us now!
Conclusion
So, using Next.JS SSR isn’t just a useful addition to your web development toolkit. This is a way to create a dynamic, productive, and SEO-friendly web application. By using Next.js SSR, you gain the ability to dynamically pre-render the pages at build time or on a per-request basis, which will meet different use cases and scaling requirements. We hope this blog helped you in implementing SSR with Next.JS.
FAQ
What pre rendering and dynamic routes?
Pre-rendering provides a static HTML file for each page of a website before it runtimes, increasing speed and SEO. Dynamic methods generate pages on demand, often using external data.
How to change a framework frequently?
To change a system frequently follow these steps:
- Maintain modular code
- Follow best practices
- Document well
- Use version control systems
What is getserversideprops function?
getServerSideProps is a Next.js function for retrieving data into a React application and rendering it as props for a page part in server-side rendering.
What is React application?
React applications are front-end web applications built with the React JavaScript library. It allow for the creation of dynamic user interfaces using reusable objects.
Is Next.js SSR better than CSR?
Next.js SSR (Server-Side Rendering) provides better basic load performance and SEO compared to CSR (Client-Side Rendering) by rendering pages on the server, increasing speed and search.

